Friday, July 29, 2011

Fussy and Fancy: Christmas In July

Wow!  Hard to believe that Christmas is only six months away!  Time to get started on some Christmas cards, and there's no time like the present!  This week over at Fussy and Fancy we want to see your Christmas in July cards!  For this week's challenge, I dug out one of my favorite James the Bear stamps (Lili of the Valley) from last year and got to town.   I used the large deckled rectangle Spellbinders to cut him out and colored him with Copics.  I then used Dimond Stickles to add some sparkle to the trim on his hat and to make the snow sparkle as well.  I used a cardstock sticker from Creative Imaginations and thought it accented the image perfectly.  The aqua snowflake paper is from Traditions.  I hadn't heard about them before, but I LOVE this sheet of designer paper.  I used the Martha Stewart deco fan border punch to accent the top and the bottom of the card and a piece of whit satin ribbon to tie everything together.  Hope you like my first Christmas card of the season and I can't wait to see yours!

Friday, July 15, 2011

Fussy and Fancy DT: Summer Theme

Well, another Friday is here, and you know what that means!  That's right!  Another challenge over at Fussy and Fancy.  This week, we have a summer theme.  I chose to go a slightly different way from a card this week.  I made a Freedom Banner for a friend to celebrate the Fourth of July holiday and I thought this would be a perfect week to showcase it!  The design for the banner is one from Laura over at FollowingthePaperTrail.  If you haven't checked her out, you need to!  Her work is absolutely amazing - the things she can do from paper is unbelieveable!  I chose this design because not only did I want my friend to have a banner to celebrate the summer holiday, but also a place to put some special photos illustrating the celebration over the years.  This design worked out perfectly!  The majority of the paper is from Bo Bunny with a few pieces from Magnolia mixed in.  I used my cricut to cut the circles and the word "FREEDOM".  I then added pleated ribbon around each circle for a dimensional look.  Each piece of the banner was tied together with some ribbon through the holes I punched with my Crop-a-Dile.  I apologize for the poor quality of the picture.  I'm having Camera woes once again - How I miss my awesome Cannon with a scratch in the lens.  May my poor camera rest in peace!!!!  Anyway, I hope you can get enough from this pictue to catch the gist of my Summer Banner/Mini Album!  Can't wait to see your summer creations over at Fussy and Fancy this week!!!

Friday, July 8, 2011

Fussy and Fancy DT: Sketch

I love altering notebooks, if you haven't been able to tell from any of my posts!  I chose to alter another one using our sketch from Fussy and Fancy this week.  Sticking with my brown and pink combination, and two of my favorite papers from Kaisercraft, I rotated a few elements around, but I think you can still see the main sketch in my project.  I chose to ink up one of my favorite LOTV stamps and color him with my Copics.  I added some stickles for an additional sparkle and some flowers from Wild Orchid Crafts.  I finished this project off with a little heart stick pin that I thought went will with the image.  Very simple, yet a thousand times better than the plain old notebooks you pick up at the store!  Hope you'll play along with us this week and create a project using our sketch over at Fussy and Fancy!  See you next week!

Friday, June 17, 2011

Fussy and Fancy DT: CASE It!

Good mrning and Happy Friday everyone!  It's the start of the weekend, which means it's time for another great challenge over at Fussy and Fancy!  Hard to believe another two weeks have passed - I sure wish things would settle down a bit so I can find a few spare minutes to craft with!  I did manage to finish this project up in the wee hours of the morning, but I really like how it turned out!  This week, we are asking for you  to CASE our DT!  Just take a look at all of the wonderful samples and choose one to CASE.  If you're not familiar with the expression, it stands for Copy and Share Everything!  That's right, you can copy one of us - copy exactly or just gain inspiration, totally up to you!  For my sample, I made another one of my favorite projects, the Copic Journal for a friend.  You can make one of your own or just make any kind of little notebook!   I colored one of my favorite Maggie stamps using my Copics, cut her out with my Spellbinders, and inked the edges.  I added some flowers from Wild Orchid and a butterfly or two.  For this journal, I added one of my recent addictions, dangly charms!  I'm still very new to them, but I loved the added touch.  It's a fairly simple project if you would like to CASE it - you can use the color scheme, make a Copic Journal or any little notebook,  or include a dangly charm on your project.  I can't wait to see what you create!


I hope you like my project and can't wait to see you over at Fussy and Fancy's Challenge Blog!

Friday, June 3, 2011

Fussy and Fancy DT: A Card for a Man or a Boy

Another two weeks have rolled around again, meaning it's time for another challenge at Fussy and Fancy!  This week, we are asking to see a card for a man or a boy.  Perfect time to work on some Father's Day cards, but any card for a man or a boy will work.  I don't know why, but I always seem to struggle more with the cards for the male population!  Maybe it's the no flowers thing, or maybe it's the colors, but I struggled with this theme as well.  I used another one of my Lili of the Valley stamps and made a birthday card for my stash.  I colored him up with my Copics, and cut him out with two of my spellbinders: Classic Ovals and my newest addition - Deckled Ovals.  I used Bo Bunny's Dot Collection, a Vintage Tag die from Magnolia, and some bling flourishes.


For the inside, I used more of the same designer paper and added some bling flourishes!


I can't wait to see your creations for a man or a boy over at Fussy and Fancy!  We are also currently having a Design Team call!  If you'd like to be part of our awesome Design Team, just enter DT after your name when you enter!  Hope to see you there!!!


I am entering this card in the following challenges:

Simon Says Stamp - Masculine Creations
Lili of the Valley - Punch It Up - Deckled Ovals, Classic Ovals Spellbinders; Vintage Tag Die by Magnolia

Friday, May 20, 2011

Fussy and Fancy DT Recipe: 3 Papers, 2 Embellishments, 1 Ribbon

Well, it's time for another challenge at Fussy and Fancy and I can't believe how fast time is flying by nowadays.  Still been having troubles with my car and the weather on top of that.  I've been terrified of storms since I was a young child and as I've grown older, the fear's only gotten worse, especially with the recent tornados.  I sure will be glad when the weather decides to settle down and become stable again!  Yesterday, it was a mix of sun and rain all day.  I was over at my DBF's house and after dinner we decided we want ice cream.  We were going to go to the place we always go to, which is less than 2 miles away from his house.  But, at the last second, we decided we wanted Dairy Queen instead and drove the other direction into town, about 12-15 miles away.  On the way back, I kept looking at the sky and commenting how weird it looked.  The sun was shining, but the sky was as dark as what I have ever seen and it just looked eerie!  I was amazed by how fast the weather and skies were changing.  By the time we get home it's torrential downpours and storming.  Come to find out that a tornado touched down with no watches or warnings whatsoever less than 2 miles from his house.  It touched down right by the ice cream place we always go to.  Thankfully, there were no injuries, but lots of uprooted trees, overturned cars, and damaged houses.  I just can't believe that there was no warning whatsoever, it literally came out of nowhere!!!!

But anyways, this week at Fussy and Fancy, we have a recipe for you to follow:  3 papers, 2 embellishments, and 1 ribbon.  I decided to make another birthday card for my stash and I inked up a stamp I haven't used in a while, Little Birthday Fairy from Lili of the Valley.  These LOTV stamps are adorable and I have really added to my collection since I stumbled upon them around Christmas time.  I colored this cutie with my Copics and added lots of Diamond Stickles everywhere.  I used three different papers from Kaisercraft, my two embellishments were my flowers from Wild Orchid Crafts and my bling from Recollections.  I also used a lace/ribbon from Wild Orchid Crafts and I love how the edges have a bit of pink color to them.  The sentiment is also from LOTV.


Here's a shot of the inside, which I used some of the same papers and my Deckled Rectangle Spellbinders.  Hope you like it and can't wait to see what you come up with this week at Fussy and Fancy!


I am entering this card in the following challenges:


Friday, May 6, 2011

Fussy and Fancy: Sketch

Ever felt like there was a black cloud hanging above your head and followed you everywhere?  Well, that's been me this past week or so.  No matter how hard I try to shake it, it's always there!  It started last Wednesday with the terrible weather - not good for somebody terrified of storms to begin with, not to mention that same somebody that was stupid enough to watch images of the massive tornados all day on TV.  Crazy severe thunderstorms and tornado warnings all night Wednesday, didn't sleep a wink!  Then, my birthday was Monday - just what I didn't want, lol, another reminder of how old I've gotten!  Then yesterday, I do believe my poor car has taken it's final breath!  I knew this day was coming and it's tragic, lol.  My car's been with me through everything...all of the thousands of hours of KFC that went into paying her off, all the trips to and from Shippensburg for Undergrad, all the trips to and from Shenandoah for Grad School, not to mention countless trips, vacations, and road trips.  But, last night, my car would not start...not even a sputter!  Thought the battery might be dead so in torrential downpours we tried jumping her...nothing.  Doesn't look for my poor old 2001 Cavalier with 147,000+ miles on her.  And it sucks because I can't afford a new vehicle at this time so I'm virtually a prison of my own house.  Oh well, gives me plenty of time to craft, right?

This week at Fussy and Fancy, we have another great sketch for you guys to follow.  I wasn't sure if I was going to like how this project turned out, but turns out, I love it after all!  My base card is from Core'dinations and my designer paper is from Kaisercraft.  I colored Tilda with Peony up with my Copics, cut her out with my Spellbinders and inked the edges.  I then added some beautiful flowers from Wild Orchid and finished the card off with some Recollection flourish bling!

For the inside of the card, I added more of the same designer paper along with a journaling block with inked edges.  Sorry the picture is sideways, but hopefully you get the idea!

 
Hope you like it and can't wait to see what you create for our Sketch Challenge over at Fussy and Fancy!  Here's hoping this black cloud soon finds a new home and leaves me alone!!!!


I am entering this card in the following challenges:

Tuesday, April 19, 2011

Fussy and Fancy DT: Springtime Image or Colors

This week at Fussy and Fancy we are looking for Springtime Images or Colors, so I took this opportunity to create a last minute Easter Card I needed.  The white paper is Pearl fromI used two of my new images from the Butterfly Dreams Collection by Magnolia and I love the way they look when used together.  I colored them both with my Copics, then cut Tilda and the little bunny out by hand and placed them in front of the wheelbarrow, which was cut out using my new Spellbinders Die.  I then tried to create a sky using Tim Holtz Tumbled Glass ink and a sponge Dauber.  The flowers are from Wild Orchid and I added some pink Recollection bling flourishes to three of the corners.  I also tucked a pink satin ribbon behind my images.


For the inside of my card, I used the same designer paper as I did on the front.  I tied a pink satin ribbon and bow around the inside panel and added a journaling block to the bottom panel using my Spellbinders again.  Finally, I added some more Wild Orchid flowers to the journaling block.  I hope you like it and can't wait to see your creations this week!


I am entering this card in the following challenges:

Magnolia-licious Highlites - Spring Extravaganza - Category #1: Full Size Card
Simon Says Stamp - For a Child
7 Kids College Fund - Easter or Spring (Tilda with Rabbit can be found here!)


Monday, April 18, 2011

Thanks for Hopping! Blog Candy Winner Announced!

I want to thank everyone who hopped along with us this weekend for the first Blog Hop that many of us have ever participated in.  It was great to receive such lovely comments and see so many new followers, so thank you!  After reading through all of the lovely comments, I began to notice a trend.  You guys want directions, so directions you shall get!

  Hmmm, let's see here...First up is the Candle.  This is a technique I learned a little over a year ago and I love the results!  You begin by stamping your image on a piece of tissue paper.  I use Memento Ink and find it works great.  Next, I gently color the image in using my Copics.  For those of you without Copics, I'm sure other markers will work as well, I just have not tried them myself.  Just be gentle when coloring in your image as tissue paper is not as sturdy as the paper many of us are used to coloring on.  When you're done coloring, cut your image out as close as possible - it's ok to leave a little bit of white around the edges, but you do not want a lot showing.  Then, position your image on your candle where you like it.  Wrap a piece of wax paper (one that is big enough to cover the image completely and wrap around to the back so you have something to hold on to) around the candle, and then use your heat embossing tool to wave over top of your image.  Some say that hair dryers work too, but I have yet to have this work for me.  As the image begins to melt onto the candle, the colors will begin to darken and have a bit of a shine to it.  When you think the whole thing is ready, simply peel the wax paper off and voila - you're done!  Next, I like to add my embellishments (flowers, ribbon, bling) but you certainly don't have too.  I also like to advise the person I'm giving the candle too that they probably shouldn't burn it (common sense, I know, but I feel better saying it too!)  Hope you guys will try this technique and let me see how yours turn out!

Next up is my first project.  Here's a link to the tutorial I found and used/tweaked for my own purposes. "Cake Card" Tutorial.  I didn't use mine as a cake card, I made it into an Easter Basket Card by not putting the lid on the cake and by adding a handle with brads.  TIP: If you're going to print the tutorial for future use, I advise copying and pasting into Word and deleting the other language - otherwise you're stuck with an 18 page tutorial like I am!  I then decided I wanted to add a box drawer to mine so I could fill it with sugar to give to my niece and then send her on her way for my sister to deal with.  Aren't I a great Aunt?!?!  Anyways, here's the link for a box drawer - my suggestion is to use scrap paper first until you come up with the dimensions you want for your easel card if you place one on top.  Box Drawer.  Believe me, it's a LOT of work, but I had so much fun creating this and like I mentioned in my post, once I envisioned it in my head I knew I had to find a way to make it work!

So there you go, there's something to keep you guys busy for a while and like I said before, I want to see some pics of some finished prodcuts if you make one!  Now, on to the Blog Candy Winner:


True Random Number Generator 7 Powered by RANDOM.ORG   (Ok, I can't figure out how to get the Min and Max numbers to stay there, but the Min was 1 and the Max was 37, and Random.org picked #7 as the winner.  If anybody knows how to copy and paste the whole box here, please let me know!)


CONGRATULATIONS CHEFKIMMO, Comment #7 is you!!!  Please send me your mailing address to tmoore82@gmail.com and I will get your goodies out to you ASAP!  Thanks again everyone for hopping along and please remember to come back and vote for my creations starting April 20th-April 27th.  There's sure to be more blog candy to follow soon!

Friday, April 15, 2011

Bashful Bunny Blog Hop (With Candy, of Course!!!)

      Hello and welcome to the Bashful Bunny Blog Hop!!!  If you've hopped you're way here from checking out Kathy's great project, then you're on the right track!  I'm so excited, as this is my first Blog Hop that I have participated in, and to share in my excitement, I am offering up some fantastic blog candy as well (Check out the bottom of this long post for details)! 

        As I mentioned previously, I was recently in the Bashful Bunny Swap over on the Cricut Messageboard and to celebrate the end of our swap and the reveal of our partners, Julie and Jana, our amazing hostesses have organized this Blog Hop to showcase some Easter projects!  I have been busy making LOTS of Easter projects over the past several weeks and decided I would just include them all in this post.  Some have been previously posted on my blog, but I'm hoping there will be many new faces (and followers!!!) that can enjoy them.  If you would like further details on any of the projects, please scroll down to earlier posts or please feel free to ask any questions!  Several projects were completed with a pretty big contest that is going on over at Magnolia-licious Highlites blog, hosted by the ever-generous Diana Crick, owner of the Magnolia-licious store.  There were four categories and each person could enter each category one time.  The categories were: (1) Easter card using Regular sized Magnolia image, (2) Easter card using Mini sized Magnolia images, (3) Anything but a card, and (4) Card using regular sized Magnolia image AND mini sized Magnolia image.   I have projects completed for at least two of the categories, definitely #4, and then one I'm not sure where it belongs, either #1 or #3.  Maybe you guys can let me know what you think?  The contest ends on April 19th and the voting runs April 20th - April 27th.  I sure would LOVE it if you guys might be willing to take a wander over to the site sometime within that week and vote for the projects you like best (maybe one of mine?!?!?).  There are some fantastic prizes to be won and rest assured, if I somehow manage to win one, there will be some blog candy in it for you guys!!!  All right, all right, enough gibberish, I know...On to the pictures!!!!

This is the card/project in question....Is it a Card?  Or is it anything but a card?  What do you think?


Here's another Easter card I've made....(and has been entered under Category #4 - Using regular sized images and a mini - the mini are the Easter eggs!)


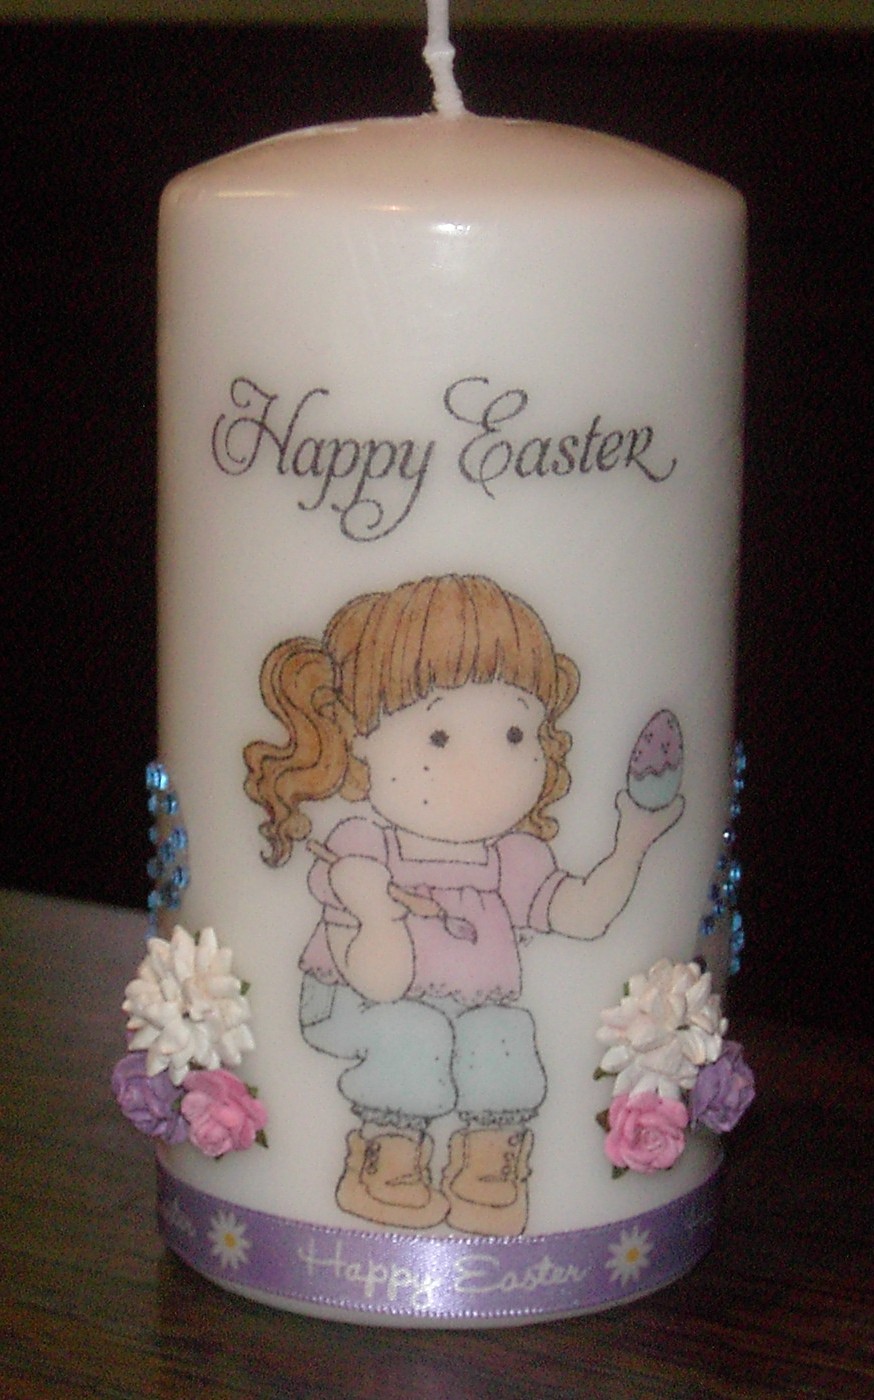
An Easter Project....

(Does it look familiar to anyone?!?!)

And finally, one last Easter card using a Sarah Kay image...


 That's all I have for right now, but remember if you would like any details on the four cards/projects that are pictured here, please scroll down to the posts or just simply ask if you have any questions!  I hope you've enjoyed what I've had to offer and I would LOVE if you made it a point to check out the Magnolia-licious Highlites blog and vote for one of my first two cards!  Hmmmmm....what else am I forgetting???  Oh yeah!  What's a blog hop without BLOG CANDY!!!!  Here's what I have to offer:

*A Brand New King Tilda stamp by Magnolia (she's a cutie!)
*Recollections Mini Pink Mulberry Flowers
*1 oz. bottle of Silver Sugar Glimmer Mist by Tattered Angels
*Stickles in Lavendar, Crystal, and Lime Green
*Tea Dye Distress Ink by Tim Holtz

To be eligible to win this blog candy, please become a follower (if you're not already!) and leave me a comment below.  Maybe tell me which category you think the first card/project should be entered under - a card, or anything but a card?  Or maybe just tell me which your favorite card is.  Either way will get you entered into my blog candy and I will draw a winner using Random Generator on April 18th.  Whew, that was a long post!  But now you're off to see what great project Terri has in store for us!

Here's the complete list so you don't get lost along the way!

Tiara (you are here!)

Thursday, April 14, 2011

Easter Candle

I'm back with a short post today.  I was recently in a swap on the Cricut Messageboard called the Bashful Bunny Swap where we were to shop for our secret partner and make or buy an Easter item.  I chose to make my partner a candle, and I guess after I post this, if she doesn't already know who I am, she will after seeing this!!!  I hate taking pictures of the stamped candles because the colors are nowhere near as vibrant in the picture as they are in real life!  For my partner, I chose to use Tilda Painting Easter Eggs, another one of my favorite Easter stamps.  I stamped her and my Easter sentiment on Tissue Paper and colored her in with my Copics before melting the image onto the candle.  I then adhered a small cluster of Wild Orchid flowers to each side of her with some blue flourishes and finished the project off with some Happy Easter Ribbon.  Soooo simple, but I LOVE the way they turn out!


I am entering this project in the following challenges:

Friday, April 8, 2011

Fussy and Fancy: For a Child

This week at Fussy and Fancy, we are looking for cards that are made for children.  For my DT entry, I created a card for the young daughter of one of my swap partners.  It's the first time I attempted a card of this sorts, but I'm pretty happy with the results.  For the front of the card, I cut a hole to view the inside using my deckled rectangles Spellbinders, then created a frame for both the outside and the inside of the cut.  The flowers are from Wild Orchid and I used my Happy Easter stamp once again.  I then added some leftover blue swirl flourishes for some added interest.

Here's the card standing up so you can see more of the dimension the frame brings.


Here's another angle, not the best picture, but once again you can see the cutout.


For the inside of the card, I used a multiple of images, and cut them all out by hand.  I used Tilda painting egg, an Edwin image from my stash, the log stump, and the spring tree.   I colored each one using my Copics and pop dotted the log stump, Tilda and Edwin for dimension.  I love the simplicity of the scene!  Oh yeah, the paper I used is the new Bo Bunny Double Dots collection.  I LOVE this paper and it comes in so many pretty colors.  I MUST find more of it somewhere!


And here's the back of the front of the card.  I left it pretty simple since the frame is there, but I included more of the blue flourishes, a small journaling spot, and another Magnolia image, the Mini Easter eggs.  I think they are the perfect size and really compliment the card!  I am really starting to love these minis - they're soooo addictive!


Well, that's all I have for this project!  I'm hoping the little girl will enjoy receiving her very own Easter card (along with a few little presents too!).  I can't wait to see what you guys create this week over at Fussy and Fancy!


I am entering this card in the following challenges:

Magnolia-licious Highlites - April Sketch Challenge - Use both Tilda and Edwin on a project
Magnolia-licious Highlites  - Easter/Spring Extravaganze - Category #4 - Combine Regular Sized Magnolia images with a Mini Magnolia Image (the Easter Eggs are a mini!!!)
ABC DT Challenge  - Easter Creations


Friday, April 1, 2011

Hello Tilda Card/Project

Have you ever just envisioned a card and KNEW that you had to make it?  Well, this idea had been floating around in my head for about a month before I actually got a chance to sit down and create it.  That's all right though because I LOVE the way it turned out!  It might be one of my favorite cards that I have made so far and it's for a very special lady, my 8-going-on-18 year old niece!  I have seen all of the beautiful cards that have been made following a tutorial on how to make a dimensional card with a 3-D cake and a candle box.  I haven't had the chance to make one of those yet with a birthday theme, but I got to thinking, why couldn't I alter the design of the card to create an Easter theme, complete with an Easter basket and a box for the eggs and little chicks! When I saw Diana's Easter Extravaganza Challenge, I knew I had to try this out!  I took it a step farther and decided to include a box drawer and fill it with Hershey's Nuggets, a favorite of my niece.  Before I lose you completely, let me begin by showing you some pictures, and I'll go back and explain some things.  BEWARE:  This post is pretty long and picture heavy!

Here is the front of my card/project.  The paper is from my stash and I have no idea who it's by.  I got it at Michaels last year on clearance and I wish I would have gotten more of it!  I love the spring feeling with the purples and the greens and it's sparkly and embossed - so pretty!  The image is Hello Tilda and from the second I saw her, I knew I wanted her!  I colored her with my Copics, inked half of the edges with purple Colorbox, and added diamond stickles to the flowers for more sparkle.  I followed the sketch at Sketch and Stash and I really like the way it turned out.  I used my Martha Stewart Doily Lace border punch, added a very light shade of purple ribbon and then a Happy Easter ribbon on top for dimension.  The image is pop-dotted and I used a lace doily to mount it on.  The flowers are by Wild Orchid and I realized I didn't have many purple flowers, so I included some Pink - I think it adds to the spring flavor of the card.  The green polka dot glittery paper is from DCWV's Nana's Kitchen stack.  I used my new Happy Easter stamp and added some pink butterflies, cut out of Pink Glitter paper.  I just used a mini glue dot in the center and turned the wings up, so they were flying.

Here's a close-up of Tilda - Isn't she a cutie?  You can't really tell in the pictures, but there is a TON of glitter and sparkle on here - I think my niece will love it!

Here's the card opened up as an Easel card and you can see the Easter basket, complete with Easter grass!  For my lid of my box, I used my Spellbinders Labels 4 die (which can be found at StampingScrapping.com) and a piece of acetate for the window.

Here's the picture with the eggs and chicks inside of the basket.  The box holds 8 chocolate eggs and 3 little chicks, which I also think my niece will love.

As I mentioned, I decided to take it a step farther to include more chocolate to get her all hyped up!  The drawer pulls out and inside are 20 of the Hershey's Milk Chocolate Nuggets.  I wrapped each one and then added a pink or yellow butterfly, both punched out of glitter paper.
Here's the box drawer pulled out to display the choclate goodies!

Here's a close-up of the egg basket and the individually wrapped nuggets.

Here's a side view:

And a back view:

And an inside view:  I added a small journaling note, cut out again with my Labels 4 Nestabilities.  I added some more butterflies and flowers and think it will be the perfect place for a little note!

This one's kind of blurry but I wnated to show the dimension of the card.

Whew!  That was a lot of pictures, but I hope you like my newest creation - I really had a blast making it and I can't wait to give it to her for Easter!


I am entering this card/project in the following challenges:

Sketch and Stash - Sketch (Hello Tilda is old stash and my Happy Easter stamp is my new stash).
Stamping Scrapping - Add Some Sparkle (Labels 4 and Circle Spellbinders can be found at this awesome store!)
A Spoonfull of Sugar - Easter Creations
Magnolia-licious Challenge - Photo Inspiration (Easter, Eggs, Grass, Pastels, etc.)
7 Kids College Fund - Seeing Spots (Hello Tilda can be found here)
Just Magnolia - Special Monthly Challenge:  Anything Goes
Magnolia Stamp Lovers - Ribbon
All That Scraps Magnolia Challenge - Spring Is in the Air, Flowers Everywhere, A Color Curve: Pastels with a Touch of Brown (Tilda's hair is brown - that's a touch, right?)
Bizzy Bec's Challenge - Two-Tone (Purple and Green are the primary colors)
By the Cute and Girly - Cute and Girly
Magnolia-licious Highlites - Easter/Spring Extravaganza - Category #3 - Anything but a Card
ABC DT Challenge - Easter Card

Friday, March 25, 2011

Fussy and Fancy: Feathers or Zippers

I must admit, this was a difficult challenge for me!  I had no idea how I was going to incorporate a zipper into my project and I was at a loss for feathers too!  Then I searched my house from top to bottom and couldn't find a single feather anywhere!  So I resigned myself to using a stamp that had a bird or feathers on it....wouldn't you know I didn't really have any of those either!  I was in panic mode until I stumbled across one of my new Sarah Kay stamps - aren't these chicks adorable!  I thought it would make for a perfect Easter/spring card - and I'm hoping to slide by with the feathers on these chicks!  I sure hope you guys get more creative with your projects using feathers and zippers than what I was able to be!

But anyways, here is my project.  I followed the sketch from Sketch Saturday and I love the way it turned out!  The butterfly/striped paper is from Graphic 45 and sent to me by a friend.  I love the colors on this project!  I used my Martha Stewart doily lace punch and her butterfly punch and there are lots of Spellbinders used as well.  I used Classic Ovals for my image and on the inside, I used my small deckled rectangles.  The flowers are by Wild Orchid Crafts and my Happy Easter stamp is a new one, only I can't for the life of me remember who it's by. (Isn't it sad when old age creeps in, hehe!)  Finally, I added some bling in the corners to tie in the pink on my image.


Here's a close-up of the image, I think she turned out cute!


Here's a shot of the inside where I once again put my Martha Stewart punches to good use!

And finally, a close-up of my journaling spot - I forgot to add I inked the edges with one of my Color Box inks as well.


Well, I hope you liked my card and I can't wait to see your creations using feathers and zippers!  I sure hope it's an easier challenge for you than it was for me this week!


I am entering this card in the following challenges:


Friday, March 18, 2011

Stamped Images Dividers

I can't believe how fast I have become addicted to the world of Magnolias and other stamped iamges as well.  Through swaps and my own collection of ever-growing stamps, I have amassed a good number of stamped images.  In my "perfect world" there is a place for everything and everything is in it's place.  However; in reality, I spend hours upon hours searching for whatever it is I'm looking for at the time.  Well, in my quest for organization, I have stumbled across a CD organizer and have discovered it's the perfect size for many things: My embossing folders, my spellbinders mounted on magnets, and now my stamped images!  I know I'll need more than one, but I figured I needed some way to organize my images.  So here's my start:


I cut my divider out of chipboard, then cut the tabs from my Cricut.  For this side, I followed the sketch from A Spoonfull of Sugar and I love the way it turned out.  I used my favorite color combination of pink and brown, as well as my favorite paper from SEI and Kaisercraft.  I cut out Waiting Tilda with my oval spellbinders, inked the edges with Tim Holtz walnut stain, added some pink bling and a flower from Prima.


The other side's picture turned out kind of blurry, but I hope you can still get the gist of it.  For this side, I followed the sketch from Sketch Saturday and love the simplicity of it.  I cut out Birthday Tilda with my circle spellbinders and used a lace doily behind it.  I inked the edges with Tim Holtz Walnut Stain and used the same paper, flowers, and bling from the opposite side.

I don't like my writing on the labels, so when I can come across my labelmaker (Where did I put that thing?), I'll use that to write the name of the collection and the year.

Here's a shot of the divider in the box with the stamped images behind it.  I have a long ways to go, but hey, at least it's a start!


I figured I'd also show you a picture of the way I organize my Spellbinders too, since I eluded to that earlier.  I cut the front of the package and adhere it to a piece of chipboard.  Then, on the back, I attach a sheet of magnet and write the name of the Spellbidners as well, making it easy to find the ones I'm looking for.  My embossing folders also fit in this box as well - I love it!


I am entering this project in the following challenges:

Sketch Saturday - Sketch
Totally Tilda - Tilda and Chipboard
Magnolia Stamp Lovers - Die Cuts (Oval and Circle Spellbinders; Tabs from Cricut)
Paper Sundaes - Keep it Simple
Going Grey - Anything Goes
Just Magnolia - Favorite Color Combination (Pink and Brown)